The Ultimate Guide to Printing a Minimalist, Two-Part Phone Stand on the Bambu Lab A1 Mini
In the rapidly evolving world of personal technology, our smartphones have become indispensable tools for communication, work, and entertainment. However, this constant connectivity comes with a physical burden: hand fatigue. Holding a phone for extended periods during video calls, recipe watching, or navigation can lead to discomfort. While there are countless commercial solutions available, nothing compares to the satisfaction and customization of creating your own solution using modern desktop 3D printing.
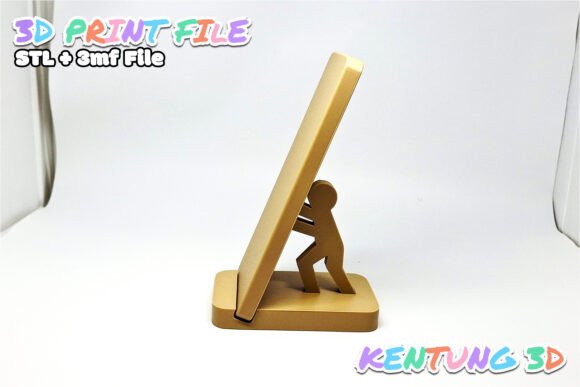
This article explores a specific, highly efficient design: a Phone Holder 3D Print Model that is engineered for ease of use. Designed to be printed in just two parts and assembled with simple glue, this project is perfect for beginners and experienced makers alike. We will break down why this specific design stands out, how it fits into modern workflows, and provide a comprehensive guide to printing it flawlessly on the Bambu Lab A1 Mini.
Why Choose a Two-Part Glue-Assisted Design?
When browsing repositories for STL files, you might encounter complex mechanisms involving hinges, sliders, or snap-fit joints. While impressive, these designs often require extensive tuning of tolerances and can be frustrating if the print dimensions are slightly off due to material shrinkage or printer calibration issues.
The "Easy to Print 2 Parts" model takes a different approach. By utilizing a straightforward assembly method—using glue to bond two interlocking or complementary pieces—the design eliminates the need for precise mechanical tolerances. This offers several distinct advantages:
- Reduced Failure Rate: Complex moving parts are prone to jamming. A static, glued structure is robust and durable.
- Faster Print Times: Fewer small, intricate details mean less chance of stringing or clogging, leading to a cleaner finish.
- Easier Post-Processing: Without support structures (as seen in this specific configuration), you avoid the tedious task of removing delicate supports from hard-to-reach crevices.
- Material Efficiency: Simple geometric shapes generally consume less filament than complex lattice structures.
This design philosophy aligns perfectly with the "Maker Mindset"—prioritizing function and reliability over unnecessary complexity. It allows you to focus on enjoying the utility of the stand rather than troubleshooting its mechanics.
The Perfect Hardware Match: Bambu Lab A1 Mini
Choosing the right hardware for a project is just as important as choosing the right file. The Bambu Lab A1 Mini has emerged as a favorite among hobbyists for good reason. Its compact footprint makes it ideal for desks where space is at a premium, yet it retains the high-speed printing capabilities of larger machines.
The A1 Mini’s closed-loop control system ensures consistent extrusion, which is critical when printing small, precise features like the lip of a phone holder. Furthermore, its automatic bed leveling and flow rate calibration reduce the "first layer anxiety" that many new users experience. When paired with the correct slicing settings, the A1 Mini produces parts that fit together seamlessly, making the gluing process smooth and professional.
Material Matters: Esun ePLA Matte
The choice of filament significantly impacts both the aesthetics and functionality of your print. For this phone holder, we recommend Esun ePLA Matte. Here is why this specific material is an excellent choice:
- Aesthetic Appeal: Standard PLA often shows layer lines and imperfections. Matte filaments diffuse light, hiding minor print defects and giving the object a premium, almost injection-molded plastic look.
- Friction and Grip: Matte finishes typically offer slightly more texture than glossy ones. This increases friction between the phone case and the holder, preventing slippage—a crucial safety feature for any phone stand.
- Printability: Esun’s ePLA line is known for low warping and easy adhesion. Combined with the matte finish, it reduces the likelihood of the part sticking too aggressively to the build plate, allowing for easier removal without damage.
Step-by-Step Printing Configuration
To achieve the best results with your Bambu Lab A1 Mini, precise slicing parameters are essential. Below is a detailed breakdown of the recommended settings for this specific STL/3MF file. These settings balance speed, strength, and surface quality.
Printer and Nozzle Specifications
Ensure your Bambu Lab A1 Mini is equipped with a standard 0.4 mm nozzle. This is the industry standard and provides the best balance between detail resolution and flow rate for objects of this size. Before starting, verify that your bed is clean and that the first layer adhesion is optimal.
Slicing Parameters
Import your tested STL or 3MF file into Bambu Studio. Adjust the following parameters to match the optimized profile:
- Layer Height: Set to 0.2 mm. This is the sweet spot for general-purpose prints. It provides sufficient detail for the phone grip while keeping print times reasonable.
- Wall Loops (Perimeters): Use 3 wall loops. This ensures the structural integrity of the holder. Since the part relies on glue for assembly, the walls must be strong enough to withstand the pressure of inserting a heavy smartphone without cracking.
- Sparse Infill: Set to 15%. A grid or gyroid infill pattern at 15% provides ample internal strength without adding unnecessary weight or print time. You do not need solid infill for a lightweight phone stand; 15% is structurally sufficient.
- Supports: Select No Support. The design is specifically oriented to print without overhangs that would require support material. This keeps the bottom surface smooth and eliminates post-processing cleanup.
Physical Dimensions and Orientation
Understanding the physical footprint of your print helps in planning your build plate usage. The final assembled dimensions are approximately:
- X-Axis: 10 cm
- Y-Axis: 6.5 cm
- Z-Axis: 8.3 cm
These compact dimensions mean you can easily fit multiple copies of this phone holder on a single Bambu Lab A1 Mini build plate, making it a great candidate for gifting or stocking up for your home office.
Assembly and Practical Application
Once the printing process is complete, remove the parts from the build plate. Inspect them for any loose strings or rough edges. Although the design is "no-support," minor artifacts may exist. A quick pass with sandpaper or a hobby knife will ensure a clean fit.
Assembly Instructions:
- Identify Part A and Part B from your print job.
- Apply a small amount of cyanoacrylate (super glue) or epoxy to the designated bonding surfaces. Avoid excessive glue to prevent squeeze-out that could interfere with the phone's placement.
- Align the parts carefully. The design likely features tabs or grooves to aid alignment.
- Hold firmly for 30–60 seconds until the bond sets.
Real-World Use Cases:
With your new matte black (or colored) phone holder ready, consider where it adds the most value. Place it on your kitchen counter for hands-free recipe viewing, on your desk for video conferencing, or on your nightstand for alarm clock duty. The matte finish resists fingerprints, keeping your workspace looking tidy even after weeks of daily use.
Conclusion
Creating a functional, aesthetically pleasing phone holder does not require advanced engineering skills or expensive equipment. By leveraging a well-designed STL file, compatible materials like Esun ePLA Matte, and the precision of the Bambu Lab A1 Mini, you can produce a high-quality tool that enhances your daily digital life. This two-part, glue-assisted design exemplifies the power of accessible manufacturing: simple, effective, and deeply satisfying to create. Whether you are a seasoned maker or printing your very first object, this project serves as an excellent introduction to the practical benefits of 3D printing in everyday problem-solving.